Crafting, Lifestyle

DIY Graduation Party Ideas That Won’t Break The Bank

My son graduated two years ago and I got off easy, all he wanted was a dinner with family and a couple of friends at one of his favorite steak restaurants.  I say I got off easy, but as a DIY’er, I really wanted to go all out for a graduation party, he wasn’t having any of that. I am very excited and happy to create these fun and easy DIY Graduation Party Ideas with all of you.  Whether your kiddo is graduating from kindergarten, 5th grade, high school, or college, you can recreate any or these projects to make their party something to remember.  As always, remember to get creative and have fun.
Graduation Candy Jars
Items Needed
8-10 Ball Jars
Candy –
              Smarties
              Tootsie Rolls
              Hershey Kisses
              Nerds
              100 Thousand Bar
              Kit Kat Bars
              Gummy Worms
              Animal Cookies
White Card Stock
Ribbon to match the graduation colors
Glue dots
Create cards to put on the front of the Ball jars.  I used a word program and then printed the labels onto card stock about 2 inches by 2 inches.  Cut the cards out and set them aside. Next, cut the colored ribbon long enough to go around the Ball jar, be sure to cut one for each jar.  Using the glue dots, adhere the ribbon to each jar and place one card on each jar.  See picture for which candy goes inside each jar.  Place them in a group or around the table as decoration.
Graduation Hat Money Box
Items Needed
Paper Mache box

Americana black paint
Sponge brush
Thin red tape or ribbon
Different denominations of money
Wooden knob
Thin yarn, usually used for needle point

First, paint the paper Mache box with the black paint and let it dry completely.  You don’t have to paint the inside, but you can if you would like to.  Next paint the wooden knob and set it aside. Roll the money into tiny diploma looking rolls and keep them sealed with either red ribbon or red tape.  Stack them in the painted box and close the lid.  To create the tassel, keep the needlepoint thread in the shape that you purchased it and cut one string off it to tie around the top of the Skeen, leaving a loop at the top.  Cut the tips of the end to make it look like a tassel.  Hook the tassel around the wooden knob.

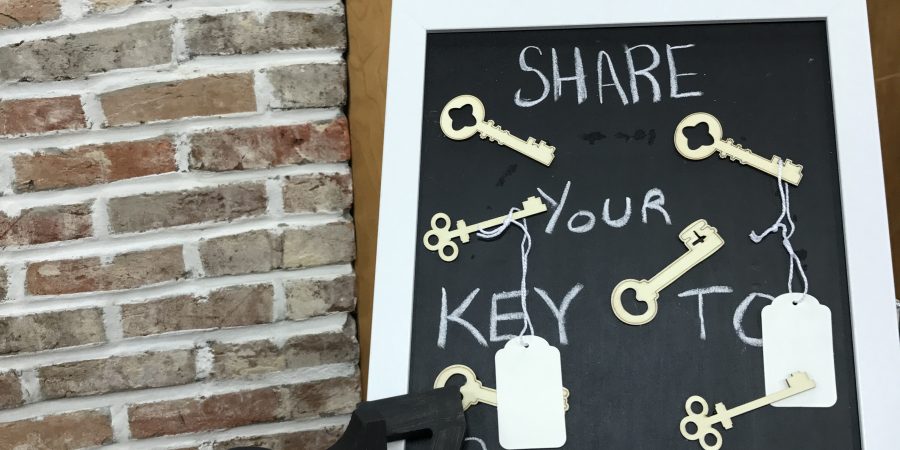
Keys To Success Board

Items Needed

Picture frame with removable wooden back
Americana chalkboard paint
Sponge brush
Chalk
Wooden or metal keys
Hot glue
Tags with string attached
Paint marker or Pen

First, Paint the wooden back to the picture frame, if your frame has glass in it, discard of it safely. Be sure to paint 3-4 coats of the chalkboard paint onto the wooden back, let it dry at least 20 minutes in between coats of paint. One the paint has completely dried, place the wooden back of the frame back into the frame. Write the phrase, “Share the Key to Success” with chalk onto the dried frame back.  Finally, hot glue the keys onto the wooden back and place the tags with a pen next to them for people to share and write what their key to success is.

Leave a Reply

Your email address will not be published. Required fields are marked *


This site uses Akismet to reduce spam. Learn how your comment data is processed.